Archive for February, 2012
Homemade Chocolate

Homemade Chocolate – version 3
This is a wonderful recipe for chocolate. I made a batch up during the holidays. They come out perfectly beautiful – the picture of mine was after I flung them into a Tupperware in the freezer, so they were a little scratched up. They were delicious and nice enough to give as gifts.
The Ingredients
- 4 oz by weight cup cocoa butter
- 4 oz by weight virgin coconut oil
- 4 oz by weight) organic cocoa powder
- ½ – ¾ cup Organic Sugar, Rapadura or Stevia equivalent
- ¼ – ½ cup raw organic cream
Step 2.
Place cocoa butter and coconut oil in a small, heat safe cup or bowl. Then place the cup or bowl in a shallow pan containing a small amount of warm (not boiling, but nearly) water. Stir the oil and butter occasionally until it’s smooth. I have a little chocolate double boiler I use.
Step 3.
Measure 4 oz cocoa powder. I have a little scale I use for ingredients (and mailing letters).
Step 4.
Pour the dry ingredients in the bowl with melted oil and butter. Stir continuously until smooth. You can add Vanilla and other flavorings as well
Step 5.
If you want to sweeten your chocolate, use ½ to ¾ cup Organic Sugar or I use Stevia equivalent to that much sugar (varies by brand). Mix in the cream. I used somewhere between ¼ and ½ of a cup.
Step 6.
Have someone check the quality Meaning… go ahead and check if the chocolate is sweet enough. You can also add the rest of the additions at this point – like chili/cayenne, dried fruit, nuts etc.
Step 7.
Pour the melted chocolate on a pan / plate / ice cube tray. You can get really pretty chocolate molds at Michaels or any cooking supply store for only a few dollars each. You can also throw some of the additions on top of the chocolate, it looks nice. Place the chocolate for 30 minutes in the freezer or 60 minutes in the refrigerator.
Ideas For Additions
Now, the basics above form the foundation of your recipe. However, if you want to jazz it up a bit, here are some ideas for what you can add:
Cocoa nibs, Dried berries, Raisins, Chopped Dates, Chili Powder, Curry Powder, Nuts, etc. Enjoy!
Read more great Monday Mania posts here: http://www.thehealthyhomeeconomist.com/monday-mania-2202012/
Read more Fat Tuesday Posts here: http://realfoodforager.com/fat-tuesday-february-21-2012/
Time to get Signatures!

We are busy this week, getting ready to start gathering signatures in California to get Mandatatory Labeling of GMOs on the Ballot for the November election.
Please join us! If you’re not in CA, you can pass the info along to friends and family who are, or give a donation.
Together we can make a difference! Mom
Here’s the Grassroots site. You can learn more, volunteer or donate at the link below.
We’re on Facebook too:
https://www.facebook.com/labelgmos
Read more great Monday Mania posts here: http://www.thehealthyhomeeconomist.com/monday-mania-2132012/
Read more great Fat Tuesday posts here: http://realfoodforager.com/fat-tuesday-february-14-2012/
Grass fed Lamb Kebobs
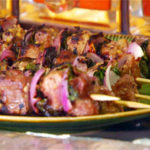
I had a pound of lamb kabob meat and wanted to make kabobs, this is a version of a wonderful Jamie Oliver recipe and was delicious!
Lamb kebabs
Makes 6–8 kebabs
• 1lb grassfed lamb trimmed and cut into 1 inch cubes
• 6–8 skewers, either wood or metal. (wood should be soaked so it doesn’t burn)
• 2 organic red onions, peeled and quartered
• 2 organic red peppers, deseeded and cut into 1 inch pieces
• 2 small, organic zucchinis, cut into 1 inch pieces
for the marinade
• 1 tablespoon smoked paprika
• 2 cloves organic garlic
• ½ teaspoon cumin seeds
• 2 teaspoons coriander seeds
• Celtic or sea salt and freshly ground black pepper
• olive oil
First bash up all the spices in a pestle and mortar until fine, then mix with the oil to make a thick marinade paste. Put the lamb pieces into a bowl and cover with the marinade.
Let them sit there for half an hour to an hour.
Then, using the skewers, spike each piece of meat alternately with red onion, zucchini and peppers.
Grill for around 5 minutes, turning regularly, to give you nicely charred meat on the outside with juicy pink on the inside.
Allow to rest for a few minutes before eating. Enjoy!
Read more great Monday Mania posts here: http://www.thehealthyhomeeconomist.com/monday-mania-262012/
Read more great Fat Tuesday posts here: http://realfoodforager.com/fat-tuesday-february-7-2012/